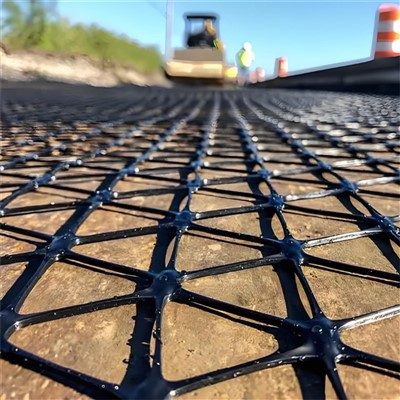

If you’ve ever worked on a construction, road repair, or landscaping project, you know uneven ground isn’t just an inconvenience—it’s a major headache. Slopes, potholes, rocky outcrops, and inconsistent soil density can undermine even the most well-laid plans, leading to premature cracking, shifting surfaces, or structural failure. That’s where geogrids come in. As a geogrid supplier with years of on-site support under our belt, I’ve seen firsthand how proper installation on uneven terrain turns a risky site into a stable, long-lasting foundation. Today, I’m walking you through the step-by-step process of installing geogrids on uneven ground, plus how to choose the right product for your unique job.
Start With Site Assessment: The Foundation of Every Good Geogrid Install
Before you even unroll a single geogrid, you need to slow down and evaluate the site. Uneven ground varies wildly—from a gently sloped backyard patio to a rocky highway embankment, each comes with its own set of challenges. Start by mapping the grade: use a level or laser transit to identify high and low points, slopes steeper than 5% (the threshold where runoff and shifting become a risk), and any areas with exposed rock, soft soil, or drainage issues. This isn’t just busywork; skipping this step leads to costly rework later.
Next, test the soil. Soft, silty, or sandy soil won’t lock into geogrid joints the way dense gravel or compacted clay does, so you may need to adjust your approach (like adding a base layer of crushed stone) before installation. Also, note the purpose of your project: are you stabilizing a road subgrade, preventing pavement cracks, or reinforcing a slope? Your end goal will dictate which geogrid works best. For example, if you’re dealing with pavement crack prevention, a fiberglass geogrid with high tensile strength is ideal, while soil stabilization on a sloped area might call for a biaxial geogrid with uniform aperture size. This site assessment phase takes 1-2 days for small projects and longer for large construction sites, but it’s non-negotiable.
Step 1: Prepare the Subgrade (And Level It Gently)
Once you’ve mapped the site, the first physical step is prepping the subgrade. For uneven ground, this means more than just clearing debris—you need to smooth the surface enough to eliminate sharp, pointy rocks or large depressions that could puncture your geogrid or create uneven tension. Start by removing all organic material (roots, sod, loose soil) and any large rocks over 2 inches in diameter. Fill in deep depressions (more than 3 inches) with compacted base material, like crushed stone or gravel, and compact it in 6-inch lifts until it’s level with the surrounding areas.
For gentle slopes, you can grade the subgrade to create a “ berm” or slight contour that matches the geogrid’s future placement—this helps prevent the grid from wrinkling or shifting after installation. For steeper slopes (over 10%), you’ll need to add horizontal benches (small flat cuts every 10-15 feet along the slope) to anchor the geogrid and prevent it from sliding down the hill. Pro tip here: don’t over-compact low spots before adding fill—this creates a “hard spot” that will pull the geogrid tight in some areas and loose in others, leading to uneven stress points. Take your time here; a properly prepped subgrade cuts your installation time in half and makes the geogrid perform 2x better.
Step 2: Select the Right Geogrid for Uneven Terrain (We’ve Got Options For Every Job)
Not all geogrids work the same on uneven ground. Choosing the wrong one is the most common mistake we see contractors make, and it leads to 30% more call backs for repairs. Let’s break down the best options for uneven sites:
- For slope reinforcement or heavy-duty soil stabilization: If you’re working on a steep slope or a site with highly variable soil density, Uniaxial Geogrid is a top pick. Its high tensile strength in one direction makes it perfect for holding back soil on sloped sites, and its rigid structure resists stretching even when you’re installing it over bumps and rocks. You can learn more here: HDPE Unaixial Geogrid
- For pavement crack prevention: Uneven ground puts extra stress on asphalt or concrete, which leads to those unsightly, costly cracks. Fiberglass geogrids are designed to distribute that stress evenly across the surface, stopping cracks from spreading. Their lightweight, flexible structure makes them easy to unroll over uneven subgrades without kinking. Check out our product here: Fiberglass Geogrid For Crack Prevention
- For general soil stabilization on flat or gently sloped sites: Biaxial geogrids have uniform openings in both directions, which means they interlock with soil particles evenly, creating a stable matrix. They come in cost-effective rolls that are easy to maneuver around uneven ground, making them perfect for driveways, parking lots, or landscaping projects. For soil stabilization specifically, our Biaxial Geogrid Rolls For Soil Stabilisation are designed to work seamlessly over uneven subgrades. View the product here: Biaxial Geogrid Rolls For Soil Stabilisation
- For projects that need a geogrid paired with fabric: If your uneven site has drainage issues (standing water is a big no for geogrid performance), our Biaxial Geogrid & Geogrid Fabric combination adds both reinforcement and filtration. The fabric keeps soil from clogging the geogrid openings, even when installed over bumpy, wet ground. You can find that product here: Biaxial Geogrid & Geogrid Fabric
- For heavy loads like industrial pads: If your uneven ground will support heavy equipment (trucks, machinery), Reinforcement Polyester Geogrid has ultra-high tensile strength that resists elongation even under extreme loads. It’s also resistant to UV damage and chemical exposure, making it a long-term solution for harsh sites. See details here: Reinforcement Polyester Geogrid
Step 3: Unroll and Place the Geogrid (Work With the Uneven Ground, Not Against It)
This is where many contractors rush and make mistakes. On flat ground, unrolling geogrid is straightforward, but uneven terrain requires a more intentional approach. Start by laying the first roll along the lowest point of your site (for slopes) or a fixed anchor point (like a foundation or curb for flat areas). For sloped sites, always work uphill—unrolling downward creates slack in the grid as you move, leading to wrinkles and poor anchoring.
When placing over uneven bumps or small rocks, don’t force the geogrid flat. Instead, gently tuck it into the low points and around the rocks, leaving a little extra slack (about 5% of the grid’s total length) to accommodate the natural contour of the ground. For large rocks (over 6 inches), cut small slits in the geogrid around the rock and press the grid snugly against the soil—never try to stretch the grid over the rock itself, as this creates tension that will pull loose over time.
Overlap adjacent rolls by at least 12 inches for biaxial geogrids and 18 inches for uniaxial geogrids (since they have higher tensile strength). On steep slopes, extend overlaps by an extra 6 inches to prevent shifting. Pro tip: Use landscape staples (6-inch, galvanized steel) to temporarily hold the geogrid in place as you unroll—space staples 2 feet apart along edges and 4 feet apart in the middle, but don’t drive them all the way yet. We’ll secure them properly in the next step.
Step 4: Anchor the Geogrid to Lock It Into Place (Critical For Uneven Ground)
Anchoring is what keeps the geogrid from shifting, wrinkling, or sliding when you add fill or traffic. On uneven ground, standard anchoring methods won’t cut it—you need to adapt based on your site’s grade and soil type.
For flat or gently sloped sites (less than 5% grade): Once the geogrid is unrolled and placed, drive the galvanized staples fully into the soil to secure the grid. For low spots that are softer, add an extra row of staples at a 45-degree angle to the grid’s direction to create a stronger hold. If you’re using geogrid fabric paired with your grid, make sure the fabric is tucked under the grid at edges to prevent soil seepage.
For slopes between 5% and 10%: In addition to edge staples, add horizontal anchor trenches every 5 feet along the slope. Dig a 6-inch deep, 12-inch wide trench perpendicular to the slope, lay the geogrid into the trench, and fill it with compacted base material. This is called a “deadman anchor” and it prevents the geogrid from being pulled downhill by the weight of the fill above.
For slopes steeper than 10%: In addition to horizontal trenches, install vertical anchors at the top of the slope (where the geogrid meets solid ground, like a retaining wall or concrete curb). Drive 3-foot long steel bars through the geogrid and into the underlying rock or compacted soil, spaced 3 feet apart. This creates a rigid anchor point that stops the entire geogrid from sliding down the slope.
A common mistake here is under-anchoring soft soil areas. If your site has silty or sandy soil, double the staple density (space them 1 foot apart instead of 2) and use heavier-duty staples. Loose geogrid is useless geogrid—don’t cut corners here.
Step 5: Cover and Compact the Backfill (Balance Is Key For Uneven Sites)
Once the geogrid is anchored, the final step is adding the overlying fill. This is where uneven ground can cause the most damage if you’re not careful. Start by adding a 6-inch lift of aggregate or base material, but don’t dump it all at once. Instead, spread it evenly across the site, working from the low points to the high points—this prevents pushing the geogrid out of place.


When compacting the backfill, use a plate compactor (not a heavy roller) for areas close to foundations or curbs, and a vibratory roller for large, open areas. The key here is to compact in layers and keep the compactor moving at a steady speed—never stop abruptly on the geogrid, as this creates a sharp stress point that will tear the grid over time. For low spots, compact the fill in small, gradual lifts to match the surrounding grade, so the geogrid is never pulled tight or left sagging.
Wait to compact the final lift until you’ve checked for any wrinkles or loose sections in the geogrid. If you find a spot where the grid is loose, add an extra staple and compact the fill again. This final check ensures the geogrid is working as intended, distributing load evenly across the entire site instead of concentrating it in a few spots.
Common Mistakes To Avoid On Uneven Ground
Over the years, we’ve seen contractors make these mistakes again and again on uneven sites—avoid them, and your geogrid install will last decades:
- Forgetting to assess drainage: Standing water under a geogrid will erode the soil around the grid’s openings, leading to failure. If your site has drainage issues, add a layer of geogrid fabric (paired with your grid) to prevent soil loss, or slope the subgrade slightly to direct water to a drain.
- Using one-size-fits-all geogrid: A fiberglass geogrid for crack prevention won’t hold up on a steep slope, and a uniaxial geogrid is overkill for a small patio. Match the geogrid to your site’s specific needs, and if you’re unsure, reach out to our team for guidance.
- Over-stretching the geogrid: Uneven ground doesn’t need a tight, perfectly flat grid. Leaving a small amount of slack to fit the natural contour of the ground is not a flaw—it’s how geogrids work best.
- Under-anchoring slopes: On even a mild slope, shifting fill can pull the geogrid loose within a year. Always use horizontal deadman anchors for slopes over 5%—it’s a small step that prevents costly repairs.
At the end of the day, installing geogrids on uneven ground is less about following rigid rules and more about adapting to your site’s unique conditions. Taking the time to assess, prep, and anchor properly turns a tricky, unstable terrain into a surface that will last for decades. If you’re working on a project and need help choosing the right geogrid for your uneven site, we’re here to help—our team has supported projects of all sizes, from residential driveways to highway embankments, and we can recommend the perfect product for your needs.
References
- Berg, R. R., et al. (2000). Geosynthetic Design and Construction Guidelines. Federal Highway Administration.
- Koerner, R. M. (2012). Designing with Geosynthetics (6th ed.). Pearson Education.
- Zornberg, J. G., & Cabal, A. (2015). Geosynthetics in Civil Engineering. CRC Press.
- United States Department of Agriculture. (2017). Soil Stabilization Using Geosynthetics. Natural Resources Conservation Service.